
 Media Stream Solutions
 Gaming Solutions
 E-Commerce Solutions
 VPN Server Solutions
 GPU Server Solutions
 Financial Solutions
 Security Solutions
For enterprise workloads, network downtime is never just an inconvenience — it's a line item. A single failed uplink, a flapping switch port, or a misbehaving upstream router can take a revenue-generating service offline in seconds.
This is exactly the problem a multi-homed dedicated server setup solves.
For sysadmins and infrastructure teams, this isn't an optional hardening step — it's the baseline for anything classified as high-availability. Done right, a multi-homed setup delivers automated fault tolerance, smarter load balancing, and a real disaster recovery path when a single point of failure would otherwise mean an outage.
What You'll Learn
What is a Multi-Homed Dedicated Server?
Prerequisites for a Multi-Homed Server
Step 1: Identify Your Network Interfaces
Step 2: Back Up the Existing Configuration
Step 3: Configure Active-Backup Bonding in Netplan
Step 4: Validate and Safely Apply Configuration
Step 5: Confirm the Bond Is Active & Test Failover
Troubleshooting & FAQ
Conclusion
What is a Multi-Homed Dedicated Server?
A multi-homed dedicated server is a server connected to multiple, independent computer networks or ISPs. If one network path or cable fails, the traffic automatically reroutes through the secondary uplink. Much like a backup power generator, multi-homing ensures your server remains continuously online and reachable during upstream network failures.
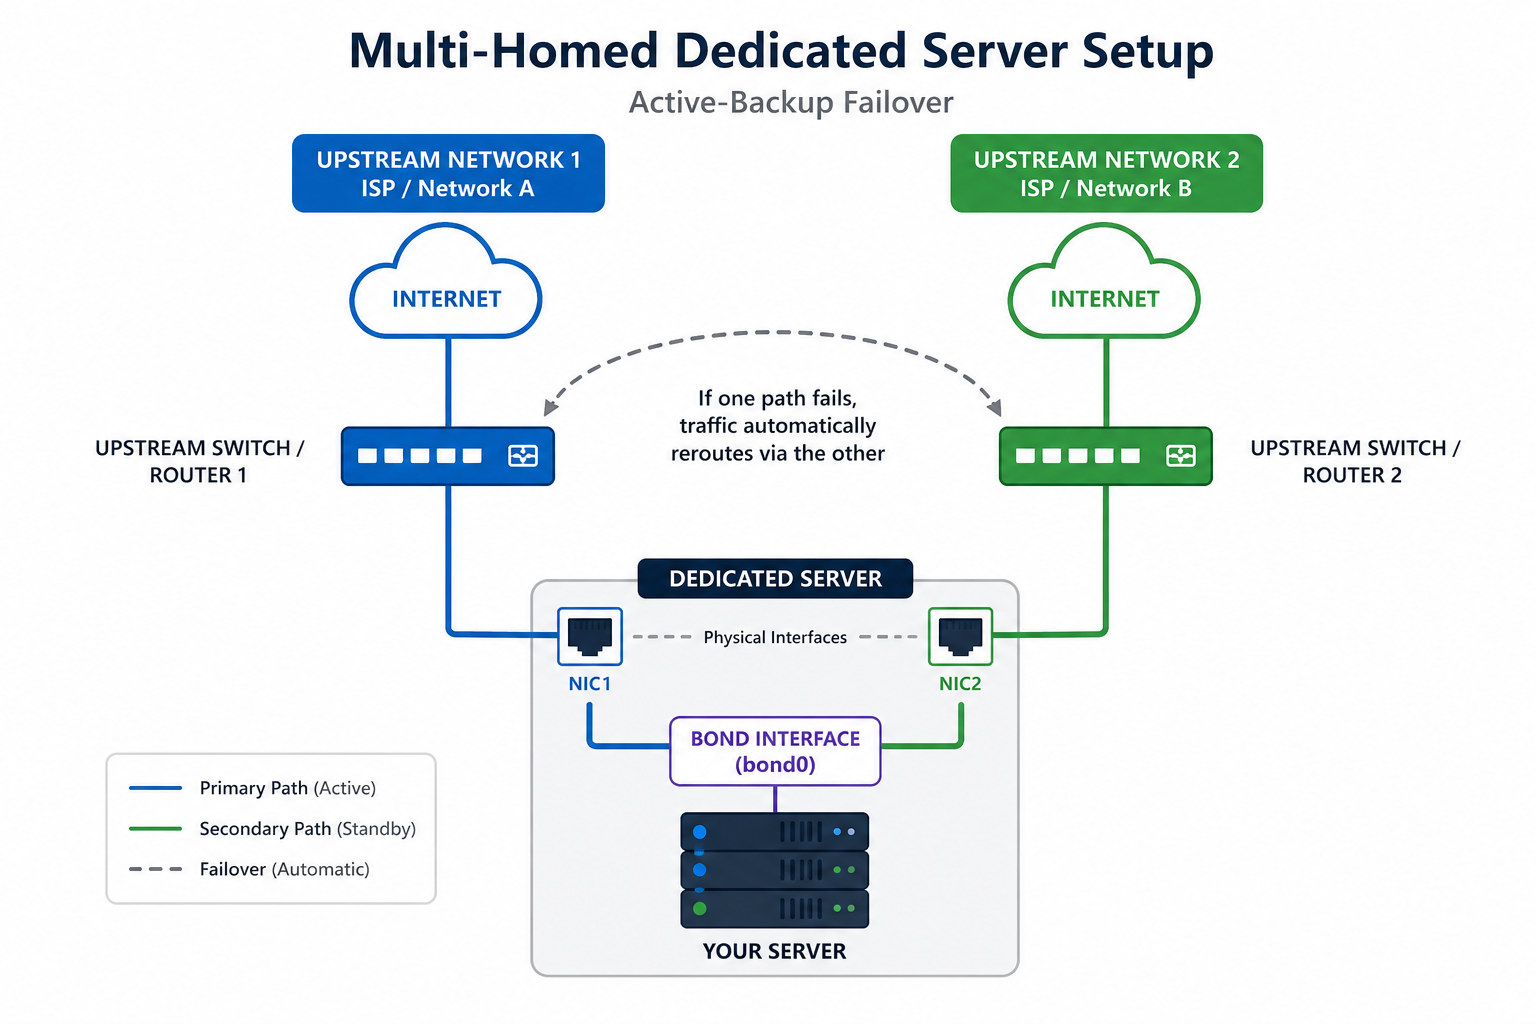
Below is a hands-on guide to building that setup on Ubuntu using Netplan, including the exact commands, a copy-pasteable bonding configuration, and the safest way to apply changes without losing SSH access.
Prerequisites for a Multi-Homed Server
Before touching any network configuration, confirm the hardware and access you'll need. Attempting this on a single-NIC server, or without console access as a fallback, is how administrators get locked out.
-
Root or sudo access: Required to modify system networking.
-
Dual Network Interface Cards (NICs): A server with at least two physical NICs, each connected to a separate switch or upstream provider for true path redundancy.
-
Out-of-band access: (IPMI, iKVM, or a rescue console) in case a misconfiguration drops your SSH session.
-
Netplan installed: This is the default on modern Ubuntu Server releases.
-
Network details: Static IP details for your uplinks, assuming you are not relying on DHCP.
Pro Tip: If you're speccing out new hardware for this kind of build, it's worth starting with a server that ships with dual NICs by default. You can browse BytesRack's dual-NIC dedicated server configurations before you begin.
Step-by-Step Multi-Homed Network Configuration in Ubuntu
Step 1: Identify Your Network Interfaces
Start by listing every network interface the kernel sees, so you know exactly which device names to reference in the bonding config.
ip aThis returns output for each interface, including its name (e.g., enp1s0, enp2s0), MAC address, and current state. Note the names of both physical NICs you intend to bond. Ubuntu uses predictable network interface naming based on hardware location, so do not expect the traditional eth0/eth1.
Step 2: Back Up the Existing Configuration
Before editing anything, copy the current Netplan config so you have a known-good fallback. (Note: Your exact filename might vary slightly, check the /etc/netplan/ directory first).
sudo cp /etc/netplan/00-installer-config.yaml /etc/netplan/00-installer-config.yaml.bakStep 3: Configure Active-Backup Bonding in Netplan
Active-Backup mode is the most reliable bonding mode for redundancy across two separate upstream connections. One NIC is active, and the second sits idle until the active link fails.
Edit your Netplan configuration file:
sudo nano /etc/netplan/00-installer-config.yamlReplace the contents with a bonded configuration like this. Make sure to substitute your actual interface names and IP details:
network:
  version: 2
  renderer: networkd
  ethernets:
    enp1s0:
      dhcp4: no
      dhcp6: no
    enp2s0:
      dhcp4: no
      dhcp6: no
  bonds:
    bond0:
      interfaces:
        - enp1s0
        - enp2s0
      addresses:
        - 203.0.113.10/24
      routes:
        - to: default
          via: 203.0.113.1
      nameservers:
        addresses:
          - 1.1.1.1
          - 8.8.8.8
      parameters:
        mode: active-backup
        primary: enp1s0
        mii-monitor-interval: 100
A quick breakdown of what matters in this config:
mode: active-backup — only one NIC carries traffic at a time; the other is a hot standby.
primary: enp1s0 — the preferred interface when both links are healthy.
mii-monitor-interval: 100 — checks link status every 100ms, making failover nearly instantaneous.
Network Engineer Note: In Active-Backup mode, the bond uses the MAC address of the active interface. Ensure your data center provider allows MAC address spoofing or multiple MACs on the switch port, or you may face port-security blocks.
Step 4: Validate and Safely Apply (Do NOT use Apply yet!)
Netplan can check your YAML for syntax errors without applying it:
sudo netplan generateIf that returns cleanly, do not just apply it. Over SSH, a wrong IP will permanently lock you out. Instead, use the try command:
sudo netplan tryThis applies the configuration but gives you 120 seconds to confirm it works. If you lose your SSH connection, the server will automatically revert to the old configuration after 2 minutes, saving you from having to use IPMI. Press ENTER to accept if your connection stays alive.
Step 5: Confirm the Bond Is Active and Test Failover
First, check the bond's status and confirm both interfaces are recognized:
cat /proc/net/bonding/bond0You should see bond0 listed with both physical NICs as slaves, with one marked as the currently active slave.
The Ultimate Failover Test: To ensure it actually works in a crisis, start a continuous ping to an external server:
ping 8.8.8.8Open a second SSH terminal and manually take down your primary interface:
sudo ip link set enp1s0 downIf your multi-homed setup is configured correctly, the ping will continue with little to no packet loss. You can bring it back up using sudo ip link set enp1s0 up.
Troubleshooting: Common Setup Questions (FAQ)
-
I applied the Netplan config and permanently lost SSH access. What do I do?
-
The bond shows both physical interfaces as "down". Why?
-
Failover isn't happening when I unplug the primary NIC.
-
Only one uplink ever gets used, even under heavy load. Is it broken?
Conclusion: Build Redundancy In From Day One
A multi-homed setup with active-backup bonding turns a single network failure from an outage into a non-event — traffic simply moves to the second uplink while the first recovers. That's the difference between a five-second blip nobody notices and a support ticket queue full of angry customers.
The one variable you can't configure your way around is the hardware and network path itself. Bonding two NICs that both run back to the same upstream switch doesn't give you real redundancy, it gives you a false sense of it.
If you're building this out for production, it's worth starting on infrastructure designed for it. BytesRack's dedicated servers with 10Gbps unmetered bandwidth and true multi-homed uplinks give you the redundant network paths this guide assumes from the start, so failover works the way it's supposed to when it actually matters. Contact our team or deploy your redundant server today.
Discover BytesRack Dedicated Server Locations
BytesRack servers are available around the world, providing diverse options for hosting websites. Each region offers unique advantages, making it easier to choose a location that best suits your specific hosting needs.