
 Media Stream Solutions
 Gaming Solutions
 E-Commerce Solutions
 VPN Server Solutions
 GPU Server Solutions
 Financial Solutions
 Security Solutions
To achieve true High Availability (HA) on a dedicated server without Layer 2 network restrictions, BGP is the gold standard. Unlike VRRP (Keepalived), which requires servers to share the same local network, BGP IP failover allows you to announce a public IP from two entirely separate machines.
The datacenter's router simply routes traffic to the primary server. If that server fails, the backup takes over seamlessly—nobody moves an IP by hand or opens a support ticket.
This guide covers a complete BGP failover build using BIRD 2 on Linux (Ubuntu 22.04/Debian 12), including the network setup, BIRD configuration, and an automated health check script that withdraws the route when your web service dies.
(Note: All addresses and ASNs below use documentation ranges RFC 5737 and RFC 5398. Replace them with values provided by your datacenter).
Table of Contents
Prerequisites & Architecture
Step 1: Network Configuration
Step 2: Installing and Configuring BIRD 2
Step 3: Automating Route Announcements
Step 4: Testing the IP Failover
Prerequisites for BGP IP Failover
You need five things in place before touching a config file:
- Two dedicated Linux servers (Server A is primary, Server B is backup).
- A provider that offers BGP sessions (You need their neighbor IP, ASN, and MD5 password if required).
- An ASN and a public IPv4 prefix (Usually a /24 or larger).
- Root or sudo access over SSH on both servers.
- Port 179/TCP open between your servers and the provider's router.
The BGP Failover Architecture (How it Works)
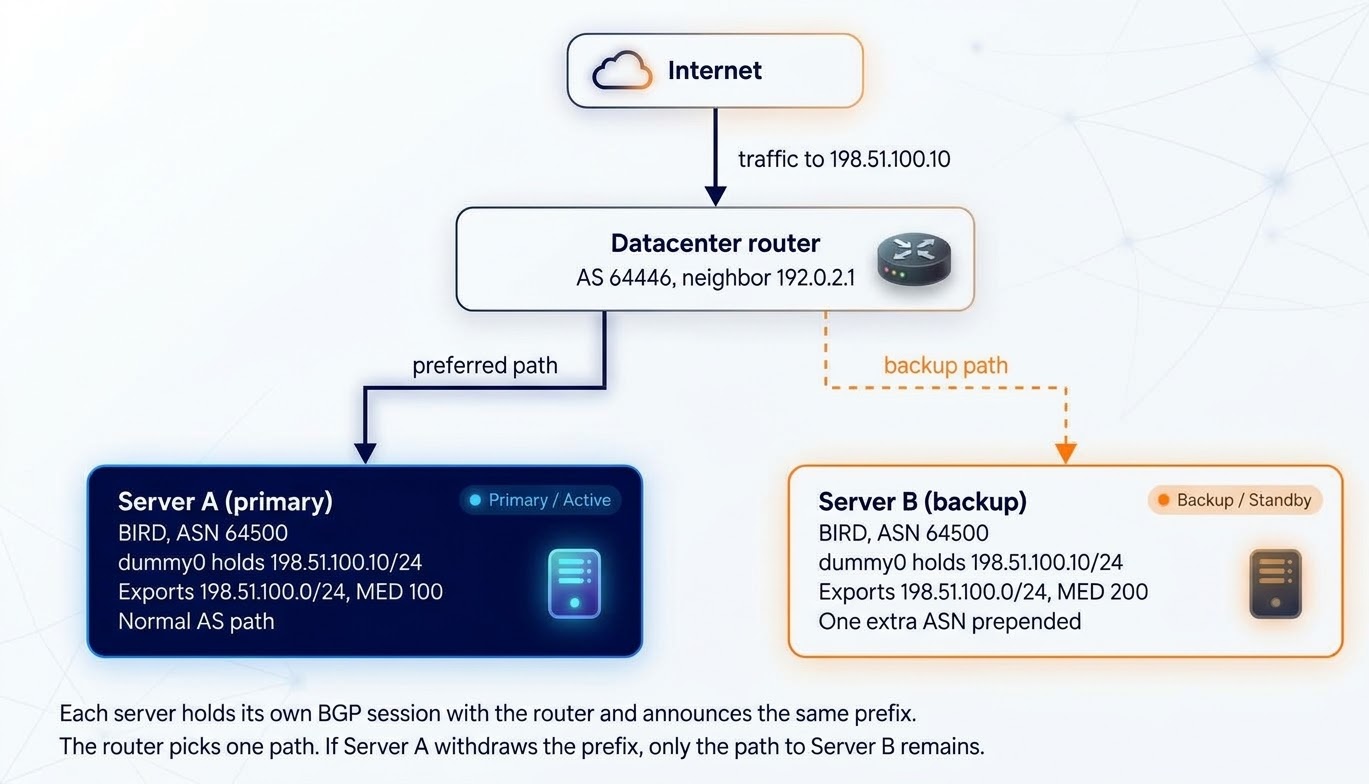
Each server carries the failover IP on a local dummy interface and announces it to the datacenter router using the BIRD routing daemon.
Both servers announce the same prefix, but with different attributes. The router prefers Server A. If Server A withdraws the prefix (because the server dies or the health check fails), only the path through Server B remains. The router immediately starts forwarding traffic there.
Step 1: Network Configuration (Adding the Failover IP)
Put the failover IP on a dummy interface, not on your physical NIC. This ensures the interface stays up regardless of physical cable issues and keeps the shared address separate from your management IP.
| Item | Example Value |
|---|---|
| Your prefix | 198.51.100.0/24 |
| Failover IP (Service address) | 198.51.100.10 |
| Server A (Primary IP) | 192.0.2.10 |
| Server B (Backup IP) | 192.0.2.11 |
| Router (BGP Neighbor) | 192.0.2.1 (AS 64496) |
| Your ASN | 64500 |
On both servers, create the dummy interface with systemd-networkd:
1. Create the device:
# /etc/systemd/network/10-failover.netdev
[NetDev]
Name=dummy0
Kind=dummy
2. Assign the address:
# /etc/systemd/network/10-failover.network
[Match]
Name=dummy0

[Network]
# Use /24 so BIRD sees the connected route for the whole /24 prefix
Address=198.51.100.10/24
3. Enable and verify:
sudo systemctl enable --now systemd-networkd
ip addr show dummy0
Step 2: Installing and Configuring BIRD 2
Install BIRD 2 on both servers:
sudo apt update
sudo apt install bird2
Configuring the Primary Server (Server A)
Replace /etc/bird/bird.conf on Server A with the following. Notice that bgp_med = 100 makes this the preferred route.
# /etc/bird/bird.conf -- Server A (primary)
log syslog all;
router id 192.0.2.10;

protocol device {
    scan time 10;
}

protocol direct failover {
    ipv4;
    interface "dummy0";
}

filter export_failover {
    if net = 198.51.100.0/24 then {
        bgp_med = 100;          # Lower MED is preferred
        accept;
    }
    reject;
}

protocol bgp upstream {
    description "Datacenter router";
    local 192.0.2.10 as 64500;
    neighbor 192.0.2.1 as 64496;
    password "change-me";
    graceful restart on;

    ipv4 {
        import none;
        export filter export_failover;
    };
}
Configuring the Backup Server (Server B)
Server B uses almost the same file, but with a higher MED (200) and AS path prepending to make it the passive backup.
# /etc/bird/bird.conf -- Server B (backup)
log syslog all;
router id 192.0.2.11;

protocol device {
    scan time 10;
}

protocol direct failover {
    ipv4;
    interface "dummy0";
}

filter export_failover {
    if net = 198.51.100.0/24 then {
        bgp_med = 200;              # Higher than Server A
        bgp_path.prepend(64500);    # AS path prepending
        accept;
    }
    reject;
}

protocol bgp upstream {
    description "Datacenter router";
    local 192.0.2.11 as 64500;
    neighbor 192.0.2.1 as 64496;
    password "change-me";
    graceful restart on;

    ipv4 {
        import none;
        export filter export_failover;
    };
}
Start BIRD and verify the session:
sudo systemctl enable --now bird
sudo birdc show protocols
The upstream line should read Established.
Step 3: Automating Route Announcements (Health Checks)
BGP doesn't know if Nginx is running. We need a script that tests the local service and disables BIRD's failover protocol if the service crashes, withdrawing the route.
Create this script on both servers:
#!/usr/bin/env bash
# /usr/local/bin/bgp-healthcheck.sh

PROTO="failover"
URL="http://198.51.100.10/whoami.txt"
FAIL_FILE="/run/bgp-healthcheck.fails"
MAX_FAILS=3

if curl -fsS --max-time 2 -o /dev/null "$URL"; then
    echo 0 > "$FAIL_FILE"
    birdc enable "$PROTO" > /dev/null
else
    fails=$(( $(cat "$FAIL_FILE" 2>/dev/null || echo 0) + 1 ))
    echo "$fails" > "$FAIL_FILE"
    if [ "$fails" -ge "$MAX_FAILS" ]; then
        birdc disable "$PROTO" > /dev/null
    fi
fi
Create the identifier files in your web root (/var/www/html):
# On Server A:
echo "server-a" | sudo tee /var/www/html/whoami.txt

# On Server B:
echo "server-b" | sudo tee /var/www/html/whoami.txt
Set up a systemd timer to run this script every 5 seconds:
sudo chmod 755 /usr/local/bin/bgp-healthcheck.shCreate the Service:
# /etc/systemd/system/bgp-healthcheck.service
[Unit]
Description=BGP health check

[Service]
Type=oneshot
ExecStart=/usr/local/bin/bgp-healthcheck.sh
Create the Timer:
# /etc/systemd/system/bgp-healthcheck.timer
[Unit]
Description=Run the BGP health check every 5 seconds

[Timer]
OnBootSec=10s
OnUnitActiveSec=5s
AccuracySec=1s

[Install]
WantedBy=timers.target
Enable the timer:
sudo systemctl daemon-reload
sudo systemctl enable --now bgp-healthcheck.timer
Step 4: Testing the IP Failover
From an external computer outside your datacenter, run two terminals:
Terminal 1 (Reachability):
ping 198.51.100.10Terminal 2 (Active Server Check):
while true; do echo "$(date +%T) $(curl -s -m 2 http://198.51.100.10/whoami.txt || echo TIMEOUT)"; sleep 1; doneIt should currently print server-a.
Trigger the Failover: On Server A, stop Nginx:
sudo systemctl stop nginxWatch Terminal 2. You will see a brief TIMEOUT, followed by server-b picking up the traffic. Start Nginx on Server A again, and traffic will route back to the primary server.
Troubleshooting
- BGP session is stuck in Connect or Active: Ensure port 179/TCP is allowed in your firewall. Verify neighbor IPs, ASNs, and MD5 passwords match your provider's details exactly. Use sudo journalctl -u bird -f for logs.
- Session is Established, but the route isn't announced: Run sudo birdc show route export upstream. If it's empty, check that dummy0 is up with the correct IP and the health script hasn't disabled the failover protocol.
- Route is announced, but traffic doesn't arrive: Ensure your web application is bound to 0.0.0.0 or specifically to the failover IP (198.51.100.10). Check local iptables/UFW rules.
Conclusion
A BGP-based IP failover setup comes down to four manageable pieces: a dummy interface, the BIRD daemon, routing preferences (MED), and a health check script. Together, they provide enterprise-grade High Availability for dedicated servers without Layer 2 limitations.
Discover BytesRack Dedicated Server Locations
BytesRack servers are available around the world, providing diverse options for hosting websites. Each region offers unique advantages, making it easier to choose a location that best suits your specific hosting needs.